Ingredients

  • 2 packets ready cooker udon noodles (I used M & S)
  • 2 dessert spoons kimchi chopped
  • 1 clove garlic grated
  • 4 spring onions chopped diagonally
  • 1 teaspoon sesame seeds
  • toasted sesame oil to season
  • 2 egg yolks
  • 1/2 stock cube
  • 150ml boiling water
  • 2 teaspoons gochujang paste

Instructions

Warm the ready cooked noodles in the microwave for a minute just bring them up to temperature. It doesn’t matter if they aren’t boiling as they are going to be added to the pan anyway.

Add the chopped kimchi with a little bit of juice in the jar if there is any and the gochujang paste to a wok with a bit of oil to cook for 2-3 minutes on medium heat. Make sure it doesnt burn by stiring every 30 seconds or so.

Stir in the grated garlic, add the noodles to the wok, mix to combine then cook for a minute or two.

Add the 1/2 stock cube to the boiling water then add to the pan and mix again to make sure the noodles are coated.

Cook for another minute or two until done.

Divide the noodles between two bowls, scatter the spring onions and sesame seeds equally between the two bowls, drizzle with a bit of toasted sesame oil.

Place an uncooked egg yolk in the middle of the bowl and mix everything in with a fork or chopsticks. Now dig in!

Ingredients

  • 1 clove of garlic finely grated or chopped
  • 1/2 teaspoon garlic powder
  • 1 teaspoon onion powder
  • 1/2 teaspoon mustard powder
  • Juice of 1/4 of a lemon
  • 4 teaspoons low fat greek yogurt
  • 4 teaspoons mayo
  • 30-40g crumbled blue cheese depending on preference. I used Cropwell Bishop Blue Stilton
  • salt and pepper to taste
  • Drizzle of good olive oil

Instructions

Grate or chop the garlic and add to a pot or bowl to mix. Squeeze the lemon juice into the garlic and leave it sit for a few minutes. I find this mellows the intensity of raw garlic as the acid cooks it somewhat like a ceviche.

Add the garlic powder, onion powder, yogurt, mayo to the pot and mix. Crumble the cheese into the mix and season with salt and pepper to taste. Drizzle a good olive oil on top to finish the dip off and give it one last stir.

You can play around with the measurements to your taste but remember the cheese will impart it’s flavour as you let it sit in the fridge so don’t worry if it’s not tasting too intense to start with.

Cover and refrigerate for at least an hour. I used mine as a dressing for iceburg lettuce, slaw and rare steak.You could also use as a dip for anything you might fancy such hot wings, breadsticks, carrot sticks, cucumber, tortilla chips.

Gochujang and peanut butter chicken thigh ingredients

  • 3 teaspoons peanut butter
  • 3 teaspoons gochujang chilli paste (I got mine from Waitrose)
  • 6 teaspoons light soy sauce
  • 3 teaspoons water
  • 1 teaspoon Korean red pepper flakes
  • 3 teaspoons rice wine or white wine vinegar
  • 2 cloves garlic chopped or grated
  • 750g chicken thighs deboned

Bibimbap ingredients

  • 200g uncooked wholegrain rice
  • 1 courgette julienned
  • 2 carrots julienned
  • 8 black kale leaves trimmed from the tough stalk
  • 8 chestnut or shitake mushrooms
  • handfull of beansprouts
  • handfull of dried seaweed soaked in water to re-hydrate
  • 2 tablespoons saesame oil
  • 3 teaspoons light soy sauce
  • 2 teaspoons Gochujang chilli paste
  • 1 teaspoon saesame seeds
  • 2 egg yolks

Sides

  • Kimchi
  • Pickled daikon
  • Pickled Korean Cucumber

The above 3 were store bought at a Korean deli on Woodfield Road in Cardiff.

Instructions

combine all the gochujang and peanut butter ingredients in a bowl apart from the chicken and red pepper flakes. Mix to combine then add the chicken thighs and massage the marinade into the chicken to coat evenly then cover and put in the fridge for a few hours for the flavours to develop.

Once you’re ready to cook, put the rice in salted water and cook to instructions on the packet. Mine took 25 minutes so I put them in just before the chicken so it was cooked in time but adjust accordingly so everything is done on time. 

Place the chicken skin side up on a grill rack, dust with the Korean red pepper flakes and put in a preheated oven at 200C for around 25-30 minutes as the bone is removed and it will take less time than normall for thighs.

Now fry each individual veg seperately for a couple of minutes with a bit of oil and season with salt to cook slightly but you still want a bit of bite as most of it can be eaten raw anyway. When each veg is done assemble them on a large plate or dish keeping them seperated from each other.

Make the gochujang sauce by combining the 2 teaspoons paste, 3 teaspoons soy, 2 tablespoons seasame oil and the saesame seeds in a bowl and mix to combine.

A bibimbap is traditionally served in a clay pot heated up on a stove or in the oven. The pot is heated up extremely hot, coated inside with saesame oil so the rice doesn’t stick then layered with the rice so it starts to crackle and produce a delicious crust on the outside where it comes into contact with the pot.

I didn’t have a clay pot and nothing safe to heat on the stove so I put a ceramic bowl in the oven to warm up coated in oil, added the rice and put in the oven for 5 minutes to heat up.

Then I assembled each of the veg going clockwise on top of the boiling hot rice, chopped the chicken and added on top, dropped the egg yolk in the middle, a dollop of the gochujang sauce depending on your preference but this is more of a sweet and warm spice rather than blow your head off Sriracha chilli sauce. 

Once your work of art is assembled, mix with a spoon or chopsticks so all the flavours are combined and the egg cooks in the heat of the rice.

No Korean dish is complete without a side of Kimchi and is ramped up with a portion or two of pickles such as daikon and cucumber.

This should feed 4

Ingredients

  • 300g bulgar wheat and quinoa mix (I got mine from Waitrose but seen them in Tesco too)
  • 1 red onion
  • 2 large tomatoes or 10 cherry tomatoes
  • 1/2 cucumber
  • 2 cloves of garlic
  • 1 lemon
  • 100g flat leaf parsley
  • 50g fresh mint
  • Salt and black pepper to taste
  • Good olive oil
  • Sumac (I bought a small tub in Tesco in the world food aisle white label area)


Optional

  • Feta cheese
  • Pomegranate (Out of season when I made it yesterday so couldn’t find any)
  • Chilli

Instructions

Use a large saucepan as the grain mixture will treble in size and the bigger it is the easier to mix all the other ingredients together too when assembling at the end.

Cook the bulgar and quinoa to packet instructions. Mine said to rinse then cook for 15 minutes, then drain and leave to stand for 10 minutes. You need the mixture to cool beofre mixing the other ingredients so you can do this an hour or two in advance if you like. You need a very fine seive to drain or I used a bowl pressed up against the pan just watch you don’t burn your hands as it gets boiling with the water draining through.

Finely grate the garlic cloves into a small dish along with the zest of the lemon. I used a fine grater I use for parmesan. Cut the lemon in half and add the juice of half to the garlic and lemon zest to the small bowl. I did this as the acid in the lemon will cook the garlic slightly so you don’t get that harsh raw garlic taste, which doesn’t seem to agree with me.

Dice the red onion, tomatoes, cucumber. Finely chop the flat leaf parsley, fresh mint and chilli then either add to the large saucepan with the bulgar wheat and quinoa or if you don’t have a pan big enough empty all the ingredients into a large bowl and mix to combine.

Add the lemon and garlic juice and squeeze the other half of the lemon into the mix. Season with a good helping of black pepper and a bit of sea salt to your liking. If you have any leftover parsley you can always chop that up and sprinkle on top as some recipes use a hell of a lot of the stuff and you might as well use it up.

Drizzle with a good olive oil and sprinkle a couple of teaspoons of Sumac over the top.

This is great as a side for some crispy grilled Ras el Hanout spiced lamb or I used a middle eastern dry rub tin from Marks and Specer mixed with some olive oil then rubbed into the lamb with finely grated garlic and left for an hour to marinade.

You can also knock up a quick mint yogurt sauce combining some mint jelly or sauce you have on your Sunday roast with some greek yogurt. Season to your taste with salt and pepper, maybe some lemon juice and if you’ve got any left some cucumber and red onion and a sprinkle of sugar.

Stuff it all in a pitta bread with some griddled halloumi and devour with a good glass of red.

Ingredients

  • 1 Fig
  • 50g cut oats
  • 3 teaspoons chia seeds
  • 2 teaspoons vanilla extract
  • 1/2 teaspoon ground cinnamon
  • 120g yogurt (I used Tesco protein yogurt but natural or Greek yogurt is fine)
  • Shredded coconut
  • Whole Milk
  • Honey

Instructions

I always add a couple of splashes of whole milk to the oats before adding everything else as I find it softens them better than yogurt alone. Mix the milk with the oats, add the yogurt and combine with the oats.

Add 3 teaspoons chia seeds, 2 teaspoons vanilla extract and the 1/2 teaspoon cinnamon. Mix to combine and add a little more milk if it is a bit too thick for you liking. Remember the chia seeds swell and absorb a lot of the moisture leaving a gell texture overnight.

In the morning or following day depending on when you want to eat the proats, slice the fig and place on top, scatter a few shards of the coconut and drizzle a healthy amount of honey on top.

Mix to combine then sit back and enjoy with a nice cuppa.

Ingredients

  • 1 cup of rice
  • 2 medium carrots
  • 1/2 savoy or hispi cabbage
  • 5 spring onions
  • 1 shallot
  • 4 cloves garlic
  • 1 teaspoon chinese 5 spice
  • 1 chilli
  • 3 teaspoons xo sauce paste with 1 tablespoon warm water (I got this from Tesco in the world food section Tesco own brand)
  • 2 eggs

Optional

  • Cooked prawns
  • Cooked chicken
  • Crispy pork chunks

Instructions

I used a teacup of uncooked rice to a pan of salted water and cooked to packets instructions. Mine took 25 minutes but aim to have it cooked just before the veg is done so you can add to the pan.

I cooked a duck in the pan first and fried everything in the rendered duck fat but if you are just having this add some oil to a warm pan then fry the spring onions and shallot for a minute or two to soften.

Add the garlic and chilli then cook for a minute to release the flavour.

Add the mushrooms and fry for a minute stiring so the garlic doesn’t burn.

Then add the carrot and shredded cabbage to the pan and mix. You might have to add a little more oil at this point. Cook for a few minutes to soften and cook the veg then add the teaspoon of chinese 5 spice and stir.

When the veg is done, add the cooked rice to the pan containing the veg and stir to combine.

Crack two eggs into the rice mixture and mix into the other ingredients so they scramble in the heat of the pan and veg.

Add the XO sauce and mix to combine. Cook for another 30 seconds then remove from the heat and distribute between two plates.

I didn’t add any meat to my rice as I had a szechuan spiced duck breast on top but if you want that authentic takeaway taste you could add any leftover meat you might have lying around such as chicken, prawns and some pork nuggets you could crisp up in a pan before adding.

Always fancied making a homemade scotch egg but not got a deep fat fryer? Fear not we’ve got it covered with a recipe needing only a standard frying pan below.

Ingredients

  • 1 packet sausage meat
  • 50g breadcrumbs
  • 50g plain flour
  • 1 egg beaten
  • 2 eggs whole
  • salt and pepper

Optional

Chopped herbs of your choice such as thyme, rosemary or a whole sage leaf cooked in with the butter and disgarded to flavour the pan.
Cayenne pepper or chopped fresh chilli.

homemade pan fried scotch egg being made

Instructions

Divide the sausage meat into two. Season the sausage meat with Salt and pepper and add any of the optional ingredients. Mix with your hands to combine then divide into two.

Make two doughnut shapes out of the sausage mix leaving a hole in the middle big enough to hold one cracked egg but remembering that the whole will close up slightly when cooking.

I found the donugt too flimsy to handle to dunk into the breadcrumb ingredients so i dabbed the plain flour around the edges of the sausage then brushed the beaten egg mixture around the edges too. Once the egg has coated the edges, dab it with the breadcrumbs to stick to the outside of the sausage doughnut.

Melt some butter in a pan then place the sausage donugts into the pan to brown the one side. After a few minutes turn the sausage over and continue to cook the other side for a couple of minutes. Crack an egg into the whole in the middle and cook for a couple more minutes for the bottom to set and sausage to firm up on the bottom.

Transfer to a baking sheet and cook for around 8 minutes making sure the sausage is cooked but you don’t want to overdue the eggs as they are 10 times better runny.

Enjoy on it’s own with a helping of a good tomato sauce or as part of a mammoth fry up breakfast.

homemade pan fried scotch egg  with breakfast

Ingredients

  • 1 medium / large sweet potato
  • 2 medium shallots
  • 1 chilli
  • 50g goats cheese
  • 1 egg
  • salt and papper to taste

sweet potato, goats cheese and chilli rosti recipe

Instructions

Peel then either grate or julienne the sweet potato.

Slice the shallots and chilli then combine with the sweet potato and mix by hand to make sure there is an even distribution of the onion. Add a generous helping of sea salt and cracked black pepper.

Chop the goats cheese into small chunks and add to the potato / onion mix.
Beat the egg and pour into the mixture then use your hands to massage the cheese and egg into the mixture aid the binding process.

Put the oven on around 180C and heat some butter in a large frying pan / skillet. Divide the mixture into 4 patties and add to the hot buttered pan leaving a space between each to not overcrowd the pan.

Cook for around 5 minutes to brown and cook the bottom so that it retains its shape. Turn carefully and cook for another 5 minutes on the other side.

sweet potato, goats cheese and chilli rosti cooking

Once both sides have been browned, add to a baking tray and cook for a further 10-15 minutes until cooked through.

This can be added as a side to a lot of dishes. I enjoyed mine with steak and sauteed kale but would go equally well with chicken or bacon for a tasty brunch or supper.


Ingredients

Should feed 4 people

  • 500g pancetta bacon chopped into small chunks (I used 2 packets of Cure and Simple Pancetta)
  • 2 shallots chopped finely
  • 10 mushrooms of your choice chopped finely
  • 6-8 cloves garlic depending on how many vampires you’re trying to ward off
  • 400g of your favourite noodle pasta (We can’t be having any seashells in this recipe!)
  • 7 egg yolks
  • 100g Freshly grated Parmesan cheese
    NO CREAM!!!

Instructions

Start the pan of salted water on boil so it’s ready when you need it. You might need a decent sized pan to fit all the cooked pasta as it’s surprising how big it expands so don’t be using one you usually warm your tin of beans in as you won’t get very far.

Cook the Pancetta on it’s own in a pan slowly to render out all of the lovely flavoursome fat in the rind. Cook it too quickly especially the air dried type of bacon and it will burn before the rind has rendered and you’re left with soggy gelatinous crap to chew on.
Once the bacon has cooked and has a nice crisp on it, remove from the pan and set aside. Now add the mushrooms to the pan of rendered fat, you might want to add an extra chunk of butter to add to the mushrooms to absorb a bit more artery clogging deliciousness to the mix. Cook for a few minutes then add the chopped shallots to start to brown too.

At the same time add the pasta to the boiling salted water and cook to desired time. I like a bit of bite but depending on if you’re using fresh or dried cook accordingly to the instructions for desired texture.

Add the garlic to the pan of mushrooms, shallots and add the bacon back in to cook for two minutes, add a good grinding of pepper before removing from the heat. Now remove the pasta from the water but before you drain all the water, take a mug of the cooking liquor.

Leave the pasta drip drain for a minute or two before adding to the pan and mixing with the ingredients. Add half of the grated parmesan to the beaten egg and pour evenly over the pasta mixture in the pan.Take a pair of tongs and mix to combine the egg and cheese mixture a bit before adding a couple of splashes of the reserved pasta cooking water. Continue to to combine the contents of the pan whilst sprinkling in the rest of the shredded cheese so you get a beautifully emulsified pasta noodle with helps the bacon, mushrooms and shallots to cling to.

Notice we didn’t add any cream like most commercial offerings? you really don’t need if as you get all the creaminess you need from the egg yolks, cheese and a helping hand from the cooking liquor to give it a bit of extra moisture.Marlborough

Divide into 4 bowls, top with some ground black pepper and a bit more shredded parmesan to taste. Can be enjoyed with a good glass of Marlborough Sauv Blanc and a crispy wedge of garlic bread.

Feeds 4-8 depending how hungry you are

Ingredients

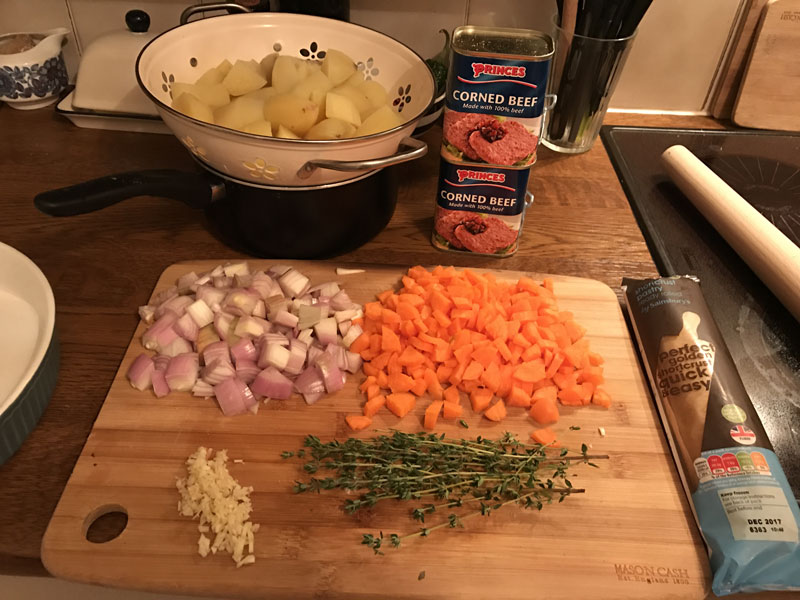
  • 2 tins of corned beef (roughly 300g each) chopped into small chunks
  • 6 medium to large potatoes for mashing
  • 3 medium sized carrots chopped finely
  • 4 shallots chopped
  • Around 15g fresh thyme, leaves only leave out the stalks. I used roughly half a 30g pack from Tesco for referrence I didn’t weigh it out.
  • Couple of splashes of Worcestershire Sauce
  • Couple of splashes of Chiptole Tobasco or I used Cholula brand
  • 2 cloves of garlic chopped finely
  • Salt and ground black pepper
  • 1 packet of ready made shortcrust pastry
  • 1 egg beaten
  • butter

corned beef pie ingredients
Instructions

Peel and cut the potatoes into medium chunks and boil in salted water until softened. I left cool completely for a few hours before preparing the rest.I then used a sharp knife and chopped at them wildly whilst in the pan to make it easier to mash later on.

Add the carrots in a frying pan and cook on a medium heat in a little oil for around 10 minutes. The finer the better as they take bloody ages to cook in a pan otherwise.

Put the oven on to warm at around 180C.

Add the chopped shallots, a little more oil if the pan is dry and continue cooking until they start to soften, brown and the carrots cook a little longer. Add the chopped garlic, stir and continue to cook for another two minutes then add a few splashes of Worcestershire Sauce and stir in again.

Add the chopped corned beef to the pan and mix with the rest of the ingredients and mashing it in with your wooden spoon. Cook for a couple of minutes whilst continuing to mix so that the corned beef softens and breaks down into a mush. Add a generous helping of ground pepper, a bit of salt and a few splashes of the chiptole sauce.

Add the thyme leaves to the pan and mix to combine. Now drop in the chopped cooked potatoes and give a quick stir to mix it with a bit of the other ingredients then use a potato masher to start mashing the potato with the rest of the other ingredients.Try to combine as much as you can but the further cooking will break down the potato further so don’t worry too much.

I added about 50g of butter cut into chunks and mixed into the mash for an extra bit of creaminess.I also added a bit of oil to grease the pie dish so that the mixture doesn’t stick too much.

corned beef pie filling

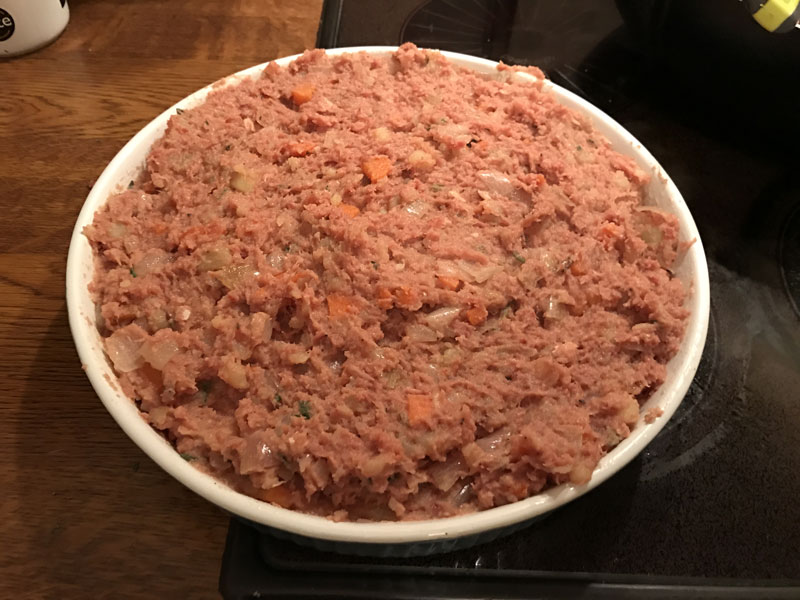
I couldn’t be bothered to blind bake the bottom of the pastry and just opted for a top piece so then continued to spoon the mixture into the pie dish, making sure to squish it down so there are no empty pockets on the side of the dish.

Smooth out on top so it’s level then drop the piece of rolled shortcrust pastry on top to cover the dish. It might need a little bit of gentle stretching to cover the edges but be carefull not to tear the pastry.

Take a knife and cut around the outside of the pie dish so that there is none overlapping. Then take a fork and press down on the edges of the pasty to crimp and make sure the pastry hugs the pie dish so there’s no gaps.

Once you’ve done a full circle, cut a little crosshair with the knife in the middle to let some steam escape the pie so it doesn’t bubble up.

No to brush the pastry with the beaten egg to give it a lovely golden sheen when it’s cooking trying not to miss any bits of the uncooked pastry. If there’s any mixture left over you can make some little pasties like my nan sometimes does or if you have a little pie dish you can spoon the mixture and top with any leftover pastry .

Add to the oven and cook for around 25 minutes depending on the oven but check from 20 minutes to make sure it hasn’t burned. Remove from the oven and leave to cool for 10 minutes as it will be scolding hot.

Cut into desired wedge size and pair with whatever you fancy from my nan’s favourite peas and gravy or you could go with beans or like I used to have break time in school sandwiched between a buttered roll with a good helping of tomato sauce on top.

This could feed 8 if you had something on the side although I had about an 1/8th of a piece then went back for another helping as I’d just done a bit fo a beasting at the Cardiff Blues bootcamp and was absolutely starving with no bread to go with it 🙁